
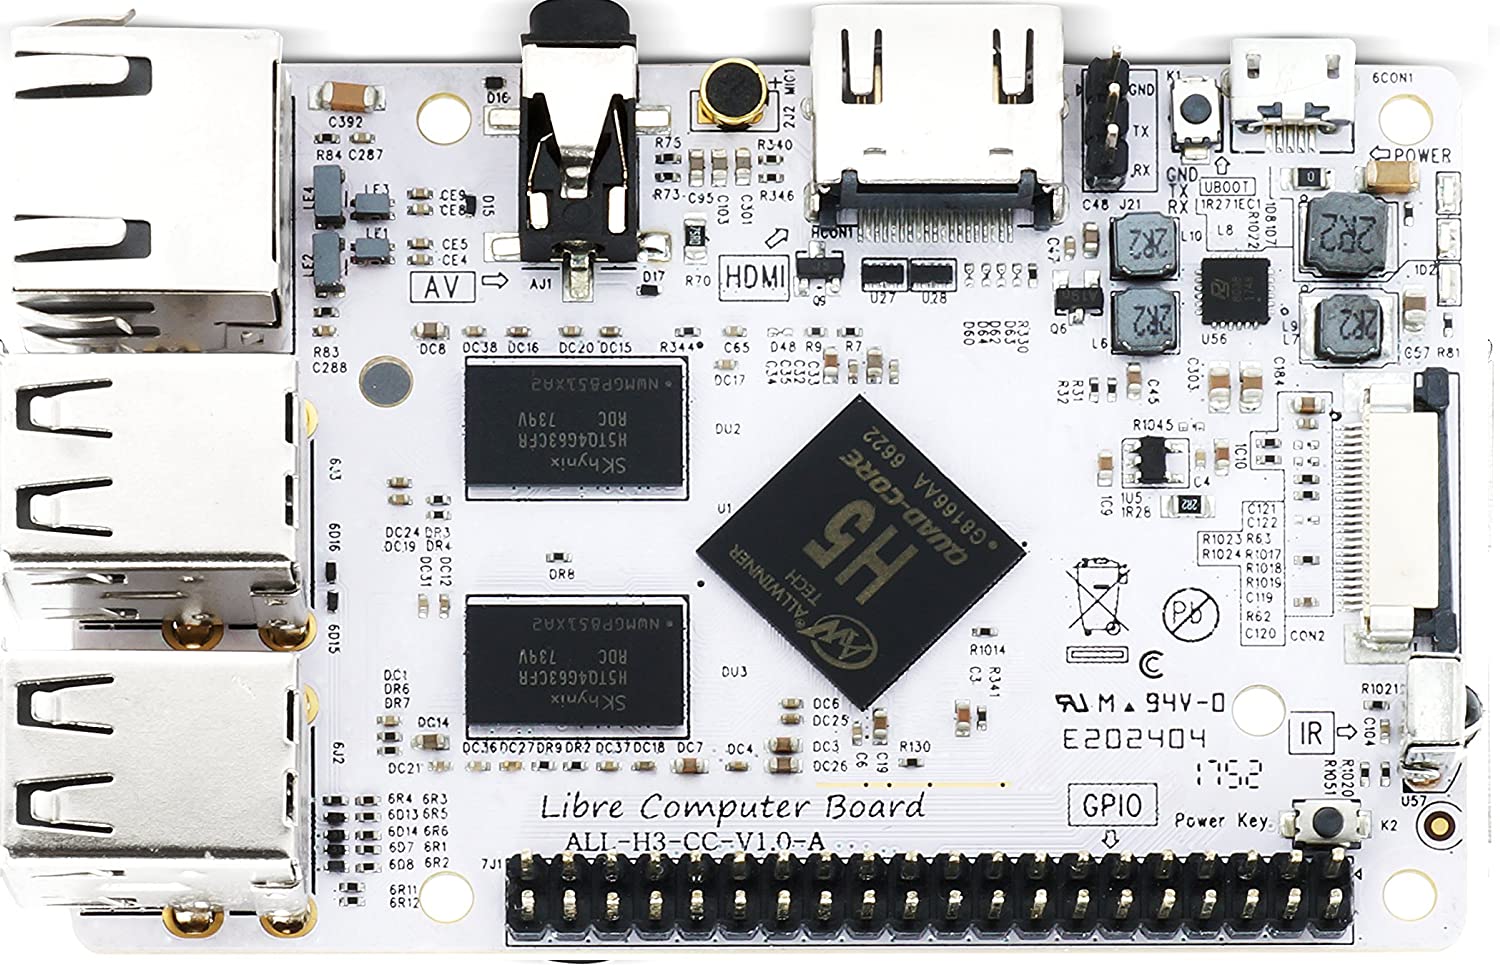
Libre Tritium H5 Setup
The Libre Tritium H5 is a small computer similar to a Raspberry Pi 3 built around an Allwinner SOC (System on Chip). The H5 has 4 ARMv7 Cortex-A cores, 2 Gb of RAM and a bunch of other features. The one that matters though is that the board is actually available. Search for official Raspberry Pi boards at the moment and you will see that they are made of Un-Obtanium. The great COVID-Supply-Chain-Shortage has caused official R-Pi prices to go through the roof and most reputable vendors like Adafruit and Sparkfun are out of stock with no firm idea of when they will return. The H5, while imperfect, fills the void in my prototyping environment.
Materials Needed
- Libre Tritium H5 board (see link above)
- Adafruit USB to TTL cable
- 64 Gb Micro SD Card (SanDisk was what I used)
- SD Card reader
A network cable and a micro-USB power supply are also useful, but not 100% necessary.
Step 1 - Download an OS image
You can choose whatever OS image you want, but the one that I used, and which I know works, is the Armbian_21.08.1_Tritium-h5_buster_current_5.10.60.img available from the Armbian Tritium H5 archive.
Step 2. Burn OS Image to SD Card
I did this with Balena Etcher which I find works well. There’s plently of documentation on how to make this difficult - just use Balena, point at the compressed image, then at your SD card and let it rip!
Note: To clean and reset SD Card see here
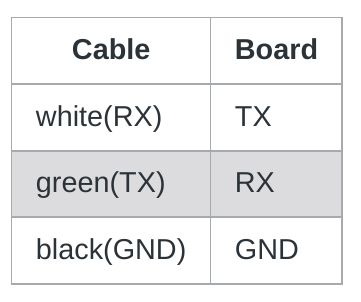
Step 3 - Connect USB-to-TTL cable
The USB cable has 4 wires, 3 of which will be used to connect to the H5 board in the following manner. (If you think about this for 1/10 of a sec, you’ll see that if you “Send” (TX) from one side, you have to “Receive” (RX) on the other. Anywho…)
Step 4 - Open a Connection to the Board
Connect the USB side of the TTL cable to a free USB port on your laptop/desktop. Then check to see what port the cable has been connected to. In Windows, this ican be seen under Device Manager, Ports. In Linux it will probably be under /dev/ttyUSB0. Either way, once you know where the cable is located, fire up Minicom.
Minicom is available for all OS and there is plenty of documentation for it. If you’re on a Windows machine and the H5 board is connected to COM 4, then in WSL (Linux Subsystem) the Minicom settings should look like this:
$ sudo minicom -s

    +-----------------------------------------------------------------------+
    | A -    Serial Device      : /dev/ttyS4                                |
    | B - Lockfile Location     : /var/lock                                 |
    | C -   Callin Program      :                                           |
    | D -  Callout Program      :                                           |
    | E -    Bps/Par/Bits       : 115200 8N1                                |
    | F - Hardware Flow Control : No                                        |
    | G - Software Flow Control : No                                        |
    |                                                                       |
    |    Change which setting?                                              |
    +-----------------------------------------------------------------------+
            | Screen and keyboard      |
            | Save setup as dfl        |
            | Save setup as..          |
            | Exit                     |
            | Exit from Minicom        |
            +--------------------------+
Make sure that E, F, and G match what is listed above, or you’ll have garbage in your terminal when you boot the board up. Select “Exit” and Minicom should stay open looking like this.
Welcome to minicom 2.7.1

OPTIONS: I18n
Compiled on Aug 13 2017, 15:25:34.
Port /dev/ttyS4, 19:19:53

Press CTRL-A Z for help on special keys
Step 5 - Boot up the H5!
Insert the SD card with the flashed OS image into the SD card socket on the back side of the H5. Connect a micro-USB cable with power to the board and then start watching the Minicom terminal.
You should see a bunch of stuff scroll past as the board boots off of the SD Card. There will be a brief lag and then you should end up with this.
Starting kernel ...


tritium-h5 login: root (automatic login)

Last login: Thu Aug 26 11:37:10 UTC 2021 on tty1
 _____     _ _   _
|_   _| __(_) |_(_)_   _ _ __ ___
  | || '__| | __| | | | | '_ ` _ \
  | || |  | | |_| | |_| | | | | | |
  |_||_|  |_|\__|_|\__,_|_| |_| |_|

Welcome to Armbian 21.08.1 Buster with Linux 5.10.60-sunxi64

System load:   44%              Up time:       1 min
Memory usage:  5% of 1.94G      IP:
CPU temp:      56°C             Usage of /:    3% of 58G
RX today:      n/a

[ 0 security updates available, 5 updates total: apt upgrade ]
Last check: 2021-08-26 11:37


Waiting for system to finish booting ...

New to Armbian? Documentation: https://docs.armbian.com Support: https://forum.armbian.com

New root password:
- If you have the board connected to your LAN via ethernet cable, you will see the assigned IP address listed.
- This is a good place to confirm that the system is properly seeing the full size of your SD card
- The root password is truly for the user named “root”. Not “pi” or “libre” or anything else, just old school “root”.
Step 7 - Create Login
Once you are asked to enter a “New root password”, you will be asked to select a shell and then create a non-root user account. This is the account that you will use in the future to access the board via SSH or serial terminal.
New root password: *******
Repeat password: *******

Choose default system command shell:

1) bash
2) zsh

Shell: BASH

Creating a new user account. Press <Ctrl-C> to abort

Please provide a username (eg. your forename):
Step 8 - Finish System Configuration
At this point it is a good time to do whatever you need in order to streamline access to the board in the future, like…
- Reconfigure SSH: For some reason, even though sshd is running and installed, you won’t be able to connect to it unles you do the following.
$ sudo rm /etc/ssh/ssh_host_*
$ sudo dpkg-reconfigure openssh-server
$ sudo apt install gstreamer1.0-tools
$ sudo apt install gstreamer1.0-alsa
Once you see that the new keys have been generated, you can test that SSH works by making a connection to localhost and logging in as yourself.
# ssh randre@localhost
Now you can shut the board down, disconnect everything and plug it into your router and run it headless.
R-Pi_Arduino